BTCPay is nice a replacement for the BitPay payment processor that allows you do your own payment processing. At first I was a bit miffed that it uses dotNet (Microsoft, but open source) but after some groaning I caved. I figured I wasn't ready to write my own in Python and no one else seemed to be doing it, so for now there is no alternative. I'd like to write something simpler in Python that runs on top a pruning sqlchain node but I just don't have time now. Add that to the todo someday list.
My first attempts with BTCPay were to use the docker deployment. I tried this twice and both times ended up aborting. The first time because I already had a node running and I didn't want to install two nodes on the server. It wasn't an option to just use an existing one. The second time because everything just got screwed up and didn't work. NBXplorer (part of the setup) just would not sync for whatever reason. Personally I'd rather just have the components on the server rather a whole raft of docker stuff as wrappers that make it hard to see what's going on.
After much head bashing I gave in and followed Mario Dian's simple but excellent manual install guide. This worked for me first time and has been reliable so far. I did make several changes so I decided to write up a brief post on what I did and why.
The first thing was I didn't want to run BTCPay as my admin user with login privilages. I already had a user named btc for running the bitcoind daemon and so decided it was ok to extend it's use for this. I created a /home/btc directory, sudo'd into that user and followed the setup guide putting dotnet, nbxplorer, and btcpayserver into that location. With PostgreSQL I just followed the guide, creating a new user. I adjusted the provided systemd service files to suit my locations and user. That all worked fine.
I run this blog and a few family sites on a couple small Vultr VPS servers. They don't have the disk space or memory for running a full node. What I do instead is run bitcoind on my home server and use a tunnel to provide it as a backend to the cheap servers. This is working well but it takes a bit of finesse to get it right. My home server has a ZFS pool on 4x3 TB HGST drives. These have proven super reliable and the pool scrubs regularly so I always know it's not deteriorating. BTCPay is installed on this server and runs right here in my home without any external access.
Then I installed autossh to oversee the reverse tunnel, and created a systemd service file (along with custom service files for btcpayserver and nbxplorer) to start the tunnel at boot and keep it up. A reverse tunnel means that when my local server starts it uses ssh to login on my Vultr node and listen on localhost:9080, relaying any traffic back to localhost:9080 locally. The simple ssh command for this is autossh -NTR 9080:localhost:9080 btc.neocogent.com (which I place in the service file) but it requires a few config lines to make it reliable.
On the local server I added these to .ssh/config (in addition to any host,user,port defaults you need):
ServerAliveInterval 15
ServerAliveCountMax 3
ExitOnForwardFailure yes
You'll want to create an ssh key and copy the pubkey to the server to allow secure automated logins. On the server end you need some similar additions to the sshd_config:
ClientAliveInterval 15
ClientAliveCountMax 3
Combined with autossh as overlord this is working well to keep the tunnel alive. To make this publicly available to my web sites that want to accept Bitcoin I also need a small nginx conf. This proxies that port 9080 with ssl support (when placed inside an ssl server block) to my btc subdomain.
location / {
        proxy_pass http://localhost:9080/;
}
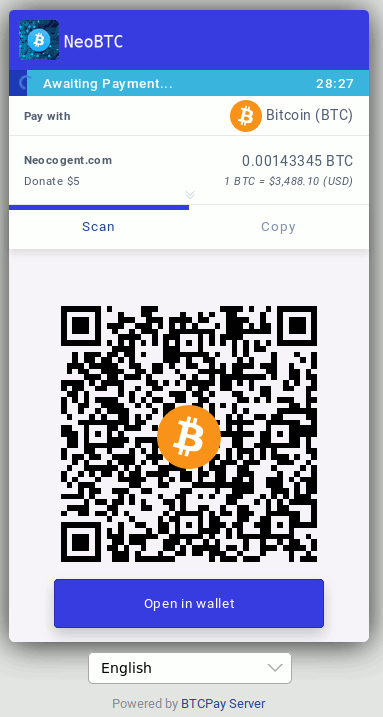
Some of my sites are running Wordpress so the last part is to install the btcpay-for-woocommerce plugin and configure it to use the same btc subdomain for payment processing. Beautiful.
Here is the btctunnel service file (note it starts when btcpayserver is up):
[Unit]
Description=BTC Reverse Tunnel Service
ConditionPathExists=|/usr/bin
After=btcpayserver.service

[Service]
User=btc
ExecStart=/usr/bin/autossh -NTR 9080:localhost:9080 btc.neocogent.com

# Restart every >2 seconds to avoid StartLimitInterval failure
RestartSec=5
Restart=always

[Install]
WantedBy=multi-user.target
None of the served sites are high activity. I'll be amazed if a bitcoin payment happens once a month. I use it for donations on this blog and though rare it's nice to use new addresses for each one. The above tunnel setup isn't even noticeable from the users perspective - perhaps slightly slower but not much. You can't tell that btcpay requests get sent to the backend at home, and it's very little traffic. On the plus side I don't need another node running on the servers - plus I feel it's more secure as the address generation happens here where no VPS admins can get in.
Finally, just so I can spiff the blog up, I customized the checkout css page to have my own logo and colours. I decided to be my own processor so I think that means I need my own logo, right? Of course, I call my own payment processor NeoBTC.